Calificaciones
En este articulo busca explicar la habilitar el comportamiento de calificaciones con estrellas o +1 a los contenidos como integración con redes sociales como Facebook, Google Plus entre otros.
Producto plone.contentratings
El producto plone.contentratings, es un producto que permite definir categorías de calificaciones, tipo de calificación y aplicarla a los diversos tipos de contenidos de tu sitio Plone.
¿Qué hace?
Para entender su funcionamiento, puede consultar un ejemplo del uso este sitio que usa este Producto Plone en la sección Editor’s rating la cual posee 4 categorías y el tipo de calificación esta basado por Estrellas.
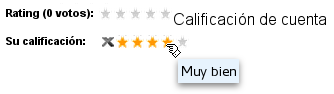
El producto contentratings.
¿Cómo instalarlo?
La instalación de este producto se realiza usando la herramienta zc.buildout para esto usted tiene que agregar el producto a las sección eggs del archivo buildout.cfg como se muestra a continuación:
eggs =
    ...
    plone.app.kss
    plone.contentratings
    ...
zcml =
    ...
    plone.app.kss
    plone.contentratings
Luego ejecute el script buildout, de la siguiente forma:
$ ./bin/buildout -vN
Con este comando busca el paquete en el repositorio PyPI, descarga e instala el producto en su instancia Zope para sus sitios Plone allí hospedados.
Entonces inicie la Instancia de Zope, de la siguiente forma:
$ ./bin/instance fg
Luego de esto ya tiene disponible el servidor Zope, el producto puede ser activado en cada sitio Plone dentro de su Instancia de Zope como se describe a continuación:
Activarlo en Plone
Para activar este producto en un sitio Web Plone 4 usted debe acceder a la sección Configuración del sitio ‣ Complementos, ubicada en la esquina superior derecha en el nombre del usuario, como se muestra a continuación:
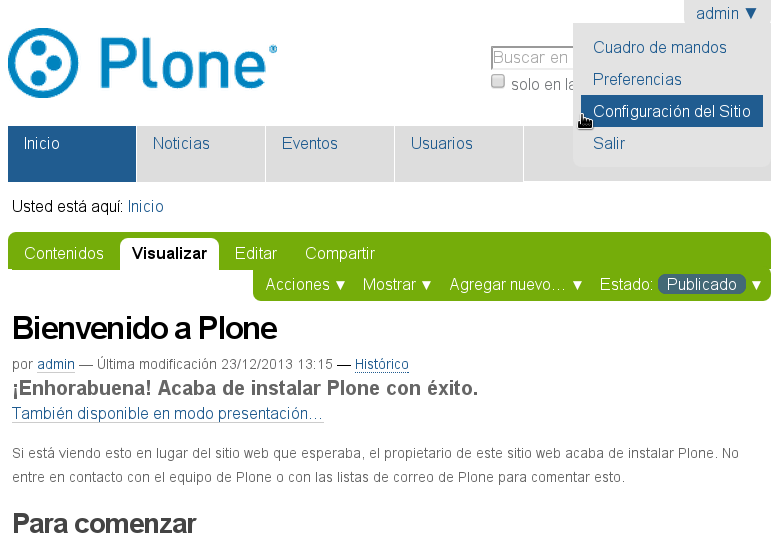
Acceder a la Configuración del sitio
Después haga clic en panel de control Complementos, como se muestra a continuación:
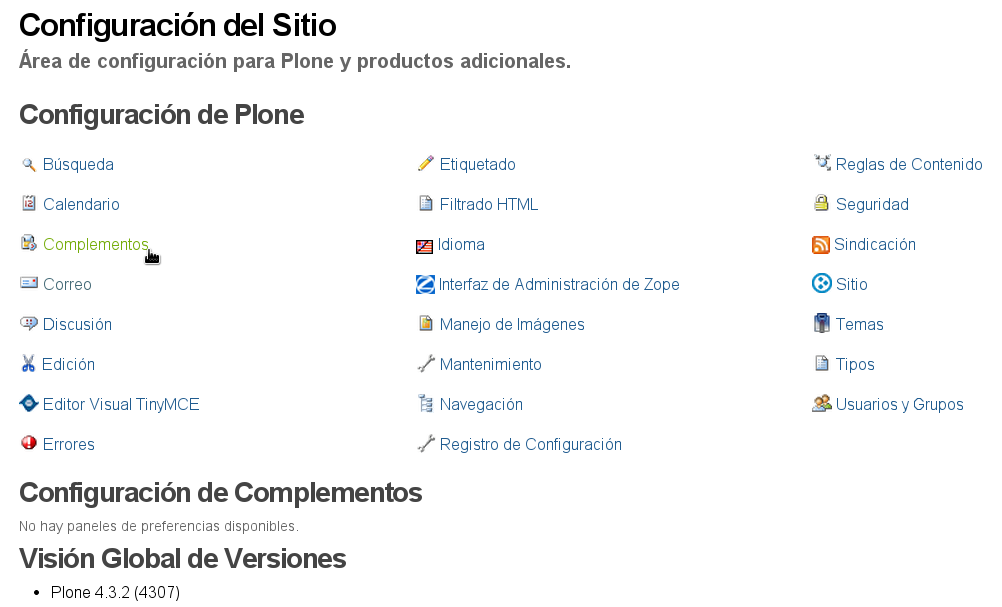
Acceder al panel de control Complementos
Entonces marque la casilla llamada contentratings y luego presione el botón Activar.
Usar plone.contentratings
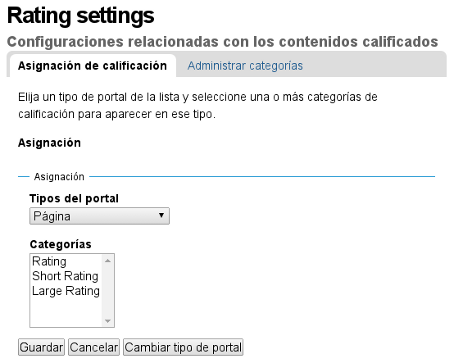
Valla al panel Configuración del sitio ‣ Calificaciones. Este panel provee dos secciones de configuración. Una para asociar un tipo de contenido particular con las categorías de calificaciones, y la otra sección para agregar y administrar nuevas categorías de calificaciones, como se muestra a continuación:
El panel de Calificaciones.
Asignación de calificación
Elija un tipo de portal de la lista y seleccione una o más categorías de calificación para aparecer en ese tipo.
On the Rating Assignments tab, you can choose a portal type and then select the rating categories to associate with the type in the multi-select below the type selector. Once you have selected the categories, press the save button before selecting another type.
Once this is done, a rating UI will appear on the view for the selected type. This ui will allow setting and viewing ratings in all the selected categories. The order in which the categories appear will be the same as the order in the multi-select, and is determined by the order specified in the rating category configuration (see the next section).
You can disable ratings on an individual content object on the edit form for that content object. Just uncheck the Enable Ratings checkbox on the Settings tab.
Administrar categorías
Agregar, modificar o remover categorías de calificaciones. Puede especificar un titulo, una descripción, las condiciones de visualización y ajuste de calificaciones, una vista para mostrar la calificación, y un número de orden relativo. Las categorías que se definen en un nivel inferior (ej., globalmente) no pueden ser editadas. Usted necesita guardar los cambios antes después de agregar o remover categorías.
The Manage Categories tab of the control panel allows you to create custom categories, and modify or remove categories that you have created. Initially, there will be no local categories, only Acquired Categories. These are categories which are not defined in the control panel but in python packages/products on the filesystem. The acquired categories cannot be edited.
To add a new category, click the Add Local Categories button. Then fill in a title for the category (this is the title that will appear in the rating UI). All other fields are optional. You may enter a description (primarily for documentation purposes). You can enter TALES expressions for determining when users can and cannot view or set ratings in the category. If left blank all users will be able to both view and set ratings. To use permissions to restrict the ratings, use an expression like:
python: checkPermission('View', context)
The order in which the categories are displayed in the UI is determined by the order attribute which should be an integer. The view setting determines how the rating should appear in the UI. Python products can register rating views to provide different look and feel or behavior. Instructions for creating and registering new views can be found in the documentation of the contentratings package. If you use a completely custom class for your view, make sure it implements the contentratings.browser.interfaces.IRatingView interface and is registered for the contentratings.interfaces.IUserRating interface, which will ensure that it appears in the listing.
You can remove custom categories by checking the box next to the category and clicking the remove button. You can of course edit any of the category attributes. You must click the Save button to record your changes (including removing categories).
Notes On Category Names: Internally, categories are registered and accessed using unique names. For TTW created categories, these names are generated from the title using a mechanism similar to that used by Plone to generate ids for content objects. This has a couple of consequences. If you create a category, rate content using that category, and then remove the category, the ratings will still be stored on the content under the original category name. So if you later create a “new” category with the same title (and hence the same name), all content previously rated under the category will still have rating information attached. This makes it very easy to undo a mistaken removal of a category, but may cause some unexpected behavior.
Additionally, this also makes it possible to override a category defined globally by creating one with an identical name. However, there is no guarantee that the names of globally defined are related to their titles, so it’s not always obvious how to do this, nor is aldoing this recommended. You may end up with two categories with the same title , differentiated only by their order, which is likely to lead to confusion when assigning categories.
Descarga código fuente
Usted puede obtener el código fuente usado en estas configuraciones buildout para este ejemplo, ejecutando el siguiente comando:
$ git clone https://github.com/plone-ve/plonedemos.suite.git
Luego de descargar este código fuente, es recomendable leer el archivo README.rst y siga las instrucciones descrita en ese archivo.
Descarga
Tabla de Contenidos
Recentpages
2015-05-19Acerca Plone
Esta es documentación para Plone®. Plone es un sistema de gestión de contenido popular, código abierto, escrito en el lenguaje de programación Python.